Personalizing Pilates' Q&A Blog – by Sherry

July 12, 2012

How to Sit with Lower Back Support

Hi everyone,

Our bodies are designed to move, they are not designed to sit for long periods of time.     One of the things that happens when we sit is that we lose the inward, lumbar curve of our lower back.    When this curve is lost, our posture suffers, we slouch and we put tremendous pressure on the discs of our lower back.     If you happen to have osteoporosis, a herniated or bulging disc, sciatica or any sort of lower back pain, it is absolutely critical that you have this lumbar curve in your spine at all times.     

The problem with sitting is that very few chairs have proper lumber support.   Even the ones that claim to have support, don’t have enough of it so we still slouch to a certain degree.
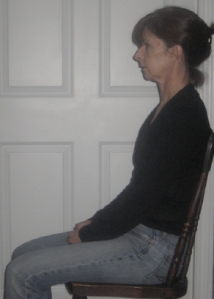
How NOT to sit

How NOT to sit

In the photo above, you might think that this is an okay way to sit because my back is supported.    But here’s the problem.   Look at my lower back.   It is flattened and there is no lumbar/inward curve in the spine.   If you have a herniated disc, osteoporosis or sciatica, sitting like this (or slouching even more) is going to make the problem worse.

Here’s what I show all of my clients.   It’s the proper way to sit with support.   It will feel a little “rigid” at first but it will quickly become comfortable.

First, you will need a good-sized bath towel.    Fold it in half lengthwise.   Start rolling it up until it’s a cylinder and secure the ends with elastics or duct tape.    When it’s finished, it should be 6 to 8 inches in diameter.     Now sit in your chair and wiggle your hips all the way to the very back of the seat.    Lean forward and place the roll behind your navel in the curve of your lower back.    There!   Now when you sit, your lower back has the lumbar curve in it but it is supported by the towel.     You’ll notice in the photo below that my spine is more vertical when compared to the first photo.   I’m not leaning back.    When sitting correctly, you should be able to draw a vertical line from the earlobe, through the shoulder to the hip.   In this photo, you can do that.   In the photo above, the line is not vertical at all!
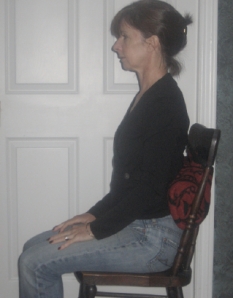
How to sit properly using a lumbar support

How to sit properly using a lumbar support

You can buy a lumbar roll instead of using a towel, but make sure it’s big enough.   Many of the ones that I’ve seen are only 3 – 4 inches in diameter which is not big enough for an adult.

Remember if you have questions, add a comment here or email me via the website (on the right).  And I’d really appreciate it if you would check out the workouts that I have on my website.    There are even special workouts for osteoporosis and herniated discs that teach you how to strengthen your abs while keeping the lumbar curve intact.

Cheers,

Sherry

December 1, 2011

Standing Pilates to strengthen your hips

Hi there!

I have a lot of clients who have osteoporosis and I teach them this exercise so that they can train for balance, stability and strength in their hips.   It’s always surprising that one hip is so much stronger than the other so do a few more reps of this exercise on your weaker side.      You can also download this exercise from my website – the exercise changes monthly so check back at the beginning of each month!

Exercise of the Month for December 2011

www.PersonalizingPilates.com

Joan Breibart, head of the PhysicalMind Institute in New York, created this exercise and included it in her book “Standing Pilates”.  I love this exercise because it can be done just about anywhere, anytime.   It’s great for mobilizing the hip joint and for strengthening the muscles that support the hips.  This exercise is fantastic if you have osteoporosis because it’s weight bearing and I’ve included in my Personalizing Pilates/osteoporosis workout.   It’s also in the Runners workout since runners need strong hips and balance because there is always just one foot on the ground when running.

  • Stand with your weight on the four corners of your right foot (base of big and baby toes, inner and outer heels).
  • Place your left heel on top of your right foot.
  • Your hips will be facing forward (a) and your eyes will be on your horizon.
  • Inhale and slide your right hip out to the right side (b).
  • Exhale and slide it back underneath you (a).
  • Repeat six or eight times and switch sides.

Start position

Slide your hip

November 18, 2011

Lower Back Strengthener

Hi everyone,

As a Pilates teacher, I see many people who have lower back pain and problems.   I would estimate that 90% of these problems come from poor posture and from sitting way too much.    Our bodies are not designed for sitting but too many of us sit for hours and hours each day.   I dare you to calculate how many hours a day you sit – from eating breakfast, commuting, working at your desk, eating dinner and watching television.   It’s not uncommon to hear that people are sitting for 8 – 12 hours a day!  No wonder their backs hurt.

Here’s an easy exercise that you can do just about anywhere and anytime.  It’s not a classical Pilates exercise although you could say that it’s a version of Joseph’s swimming or flight exercise.   It’s known as a McKenzie exercise, named after Robin McKenzie who is one of the world’s leading authorities on lower back pain.

To do the exercise, follow these cues:

  1. Stand with your feet a bit wider apart than your hips
  2. Keep your knees straight
  3. Place your hands in the small of your lower back, fingers turned inward
  4. Imagine doing a back dive over your hands, lifting your heart out of your chest
  5. Hold for a couple of breaths
  6. Repeat three times

Try to do this exercise every hour or so when you need to sit.   If you’re at the office, you can do it in the washroom where it is private.   It will help to strengthen your lower back safely.

Questions?  Don’t hesitate to email me.   I’m here to help.

And please check out the downloadable MP3 workouts on my website.   They’re easy to follow and very effective.   Plus, if you input promo code 4001 when you place your order, you’ll get 10% off your entire order!

Sherry

October 6, 2009

How to protect your lower back

Hi everyone!

I wanted to pass along a neat trick that I learned that is really helpful for people who have a weak or sore lower back.    This is not a Pilates exercise, but more of what I call a “common sense” technique that is easy to incorporate into daily life.    

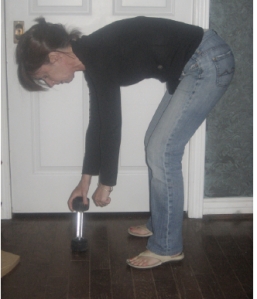
One of the best ways to hurt your lower back is to bend forward and pick up something.    For example, bending forward and picking up a bag of groceries or even a pair of shoes off the floor will put a lot of strain on the small, supportive muscles of your lower back.     The first photo below is a perfect example of what NOT to do.    The model is bending forward with a rounded spine with both arms reaching down to pick up the weight.    


How NOT to pick up something

How NOT to pick up something

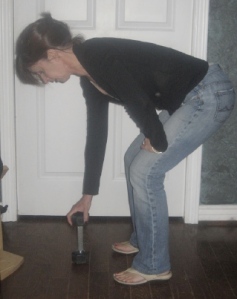
A better way to pick up something is to have “three points of support” – two feet and one hand.    The photo below shows a better way to pick up the weight.   The model is bending forward as well as reaching her hips back a bit so that her back is not rounded as in the first photo.   Notice that she also has one hand on her thigh.   She has lots of weight on her hand so that there is less stress on her lower back.   Once she picks up the weight, she uses her hand to push herself back up so that the small muscles of the lower back are protected.


3 Points of Support (2 feet and 1 hand)

3 Points of Support (2 feet and 1 hand)


If you have any spinal conditions, this is really important for you to do when picking up objects (even light ones!).   Even if your spine is healthy, why risk having a herniated disc?

Remember, I’m here to help if you have questions.   My e-mail and website are on the right side of the page!

Sherry


September 23, 2009

Abdominal Anatomy & How to Flatten Your Tummy

Hi everyone!

I was working with a new client this week who was referred to me by her chiropractor.   She came to me because she has lower back pain and her core stability needs a bit of work.    When we were chatting to determine her goals, she said that she didn’t understand why her back was sore because she did sit-ups every day and that her abdominals were strong.    When I did a few tests for her abdominal strength, we determined that she was actually very weak.     Once I taught her a bit about the anatomy of the abdominals, she understood why sit-ups weren’t helping her back (in fact, they were making it weaker).    

There are four different layers of abdominal muscles.  

Most of us are very familiar with the outermost, superficial layer because this layer creates the “six-pack” look that you see on fitness models.   This outermost layer is called the Rectus Abdominus.    The job of the Rectus Abdominus is to curl the trunk forward so it’s the main layer of abdominal muscle that  is used when you do a traditional sit-up.     Most people who want to flatten their tummy will start doing lots and lots of sit-ups so that they have a strong outer layer of muscle.   Unfortunately, this is NOT the way to flatten the tummy because flattening the tummy is the job of a different layer of abdominal muscle.

The next two layers of abdominal muscle are called the Outer and Inner Obliques.   These two layers of muscle wrap around the body on an angle and their job is to curl and twist the trunk.   So if you are a golfer, these muscles need to be strong!

The fourth layer is the innermost layer of abdominal muscle.  It’s called the Transversus Abdominus.   It is like a corset that wraps around the body and holds everything in place.    This is the layer of abdominal muscle that supports the spine so that you don’t have lower back pain.   It’s also the layer of muscle that you need to strengthen if you want to flatten your tummy!

If you want to flatten your tummy, here’s an easy exercise that will strengthen the innermost Transversus Abdominis muscle.

  • Lie on your back with your knees bent and feet flat
  • Place one hand underneath your lower back
  • Place the other hand on top of your navel
  • Take a breath in through your nose
  • When you exhale, gently pull your navel down towards your bottom hand (avoid doing a pelvic tilt!)

When you exhale, you will feel that your tummy flattens underneath your top hand!   That’s the Transversus Abdominis muscle doing its job!

It’s important NOT to flatten your lower back when you do this exercise because doing so actually weakens the lower back.  So gently pull your navel down when you exhale but try not to squish your bottom hand!

Need help?  Have questions?   Let me know….I’m happy to help you!

Sherry

July 29, 2009

Stretch to relieve sciatica

Filed under: leg pain,lower back exercises,pilates,sciatica — personalizing pilates @ 5:04 pm
Tags: ,

I got an e-mail from Liz asking for a way to relieve the pain of sciatica.

First, a bit of background info…..sciatica is a term for pain that radiates from the lower back, into the buttock and down the leg.   The sciatic nerve is the longest nerve in the human system and it travels from the spine, exiting in the lower back and it goes down the leg all the way to the foot.    Sciatica can be caused by many factors including poor posture (very common!), muscle spasms, wearing high heels (sorry ladies!), pregnancy, being overweight or disc herniations.   The pain generally travels down one side of the body.   Even though you might feel the pain in the leg, it’s important to understand that the cause of the pain is in the lower back.  

Here’s a stretch that you can do to help stretch the tight muscles.   It’s typically called a Figure 4 stretch but I like to call it the Pretzel Stretch because I feel like a pretzel when I do it!

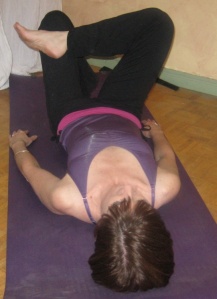
Lie on your back with your left foot on the floor.   Place your right ankle on the front of your left thigh.   It looks like the photo below:

figure 4 stretch prep

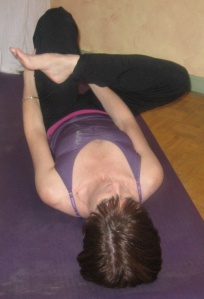
Now, pick your left foot up off the floor,  hold the back of your left thigh and gently hug your left knee in towards your left shoulder  (as shown in the next photo):

figure 4 stretch

You will be feeling a stretch in the right hip, hopefully at the back of the thigh and deep in the buttock.

BREATHE!!!   If this is intense for you, you’ll be inclined to hold your breath!     Hold the stretch for 6 long, slow breaths.

Switch sides and hold for 6 breaths.

You will likely notice that one side is much tighter than the other!  And it may be the side that is opposite to where you feel the pain!   That is normal.

I recommend stretching the tighter side more often so you may want to do the tighter side a second time.

Try this stretch twice a day for a week and see if it gives you relief.   

Please post a comment or e-mail me at Sherry@PersonalizingPilates.com if you have questions or need help!    I’ll get back to you in just a few hours, promise!

Take care,

Sherry

Create a free website or blog at WordPress.com.